Norwood CSA Food Co-op: July 2024

Monday, July 29, 2024

Marinated Cucumber, Tomato, and Onion Salad by Patrice Hall

Marinated Cucumber, Tomato, and Onion Salad 

by Patrice Hall

Bowl of cucumber, tomato and onion salad. Photo:

Hannah Zimmerman


There are some weeks where you need a salad that keeps for a while in the fridge, bonus points if the flavor improves the longer it stays.  This is that salad!  I was looking for a salad without lettuce which will keep in the fridge longer for these hot summer days.  SouthernLiving.com has a plethora of recipes for hot weather days, it has become a resource for me.  We are due to receive our tomatoes soon (Here’s hoping 😊) so this is a recipe to use them along with the cucumbers and onions.  Although this recipe calls for red onion, I will try it with the spring or yellow onion in the fridge if I don’t have the red.  Also, you can experiment with the herbs in the dressing if you wish to change the flavor, have fun!


Recipe by Stacey Ballis at SouthernLiving.com

Active Time: 15 mins

Marinate Time: 12 hrs

Total Time: 14 hrs 15 mins

Servings: 6

Ingredients

2/3 cup extra-virgin olive oil

2 1/2 Tbsp. sherry vinegar or red wine vinegar

1 Tbsp. dried herbes de Provence or Italian herb blend

1 tsp. kosher salt

1/2 tsp. freshly ground black pepper

Pinch red pepper flakes (optional)

3 large ripe beefsteak-style tomatoes, cored and cubed into 3/4-inch chunks

1 medium red onion, halved and sliced into thin half-moons

1 large English or seedless cucumber, peeled and quartered lengthwise, then diced in 1/2-inch chunks

Garnish: Minced fresh herbs to serve, such as parsley, basil, chives or chervil (optional)


Directions

Make dressing:

Mix oil, vinegar, dried herbs, salt, black pepper, and red pepper in a large bowl with a tight-fitting lid.


Add cucumbers, tomatoes, and onions:

Add the vegetables, and toss well to coat and combine.


Marinate:

Leave at room temperature for one hour. Toss again, and taste for salt and pepper. Adjust seasoning as needed. Cover with lid (or spoon into a zip-top bag), and store in the fridge for 12 to 24 hours, stirring occasionally.


Season and serve:

Let come to room temperature for 30 to 60 minutes before serving. Top with optional minced herbs.

For more tips, see the full recipe at SouthernLiving.com.

********* 

Interested in learning more about the Norwood CSA? Check out our Info Page: https://norwoodfoodcoop.blogspot.com/2021/10/how-to-join-norwood-csa.html

Sour Cherry Jam by Callum Heidi Prytherch

Sour Cherry Jam 

by Callum Heidi Prytherch


Pint of cherries on a kitchen counter.
Quart of cherries on a counter next to ginger root, a wrapped bouquet of flowers, and a trivet shaped like a red-capped mushroom. Photo by author.

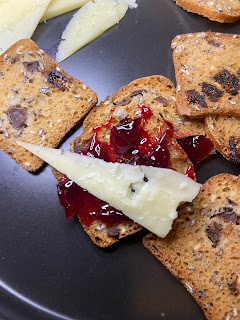
In this past week's farm share, we received some beautiful sour cherries. Visions of a cherry jam paired with the last of the Womanchego cheese from Cato Corner Farm filled my mind. This is an easy pectin-free recipe for a sour cherry jam. The lemon juice adds some brightness while the vanilla offers some sweetness to balance out the sour flavors. The sugar is adjustable and to your taste.


Sour Cherry Jam Recipe (no Pectin)


Ingredients:

1 Pint Sour Cherries

Juice of one Lemon

1 Teaspoon Vanilla Extract/Paste

1 Cup Sugar


Instructions:

  1. Place glass plate in freezer for 5-15 minutes.

  2. Depit cherries and remove stems. Roughly chop fruit.

  3. Place cherries in a saucepan and add lemon juice. Bring to a boil over medium high heat.

  4. Cook for twenty minutes while continuously stirring.

  5. Add sugar and vanilla extract (or paste if using). Continue cooking until cherry mixture reaches gel phase at 225 degrees F. If you don’t have an instant thermometer, you can use the frozen plate to check by spooning a small amount of the jam onto the plate, returning it to the freezer for a minute, and then sticking your finger in it. If the jam wrinkles, it is done.

  6. Turn off heat and can the jam. Store in the fridge for immediate use or process in a water bath canner for ten minutes to make it shelf stable.


    Cherry jam on whole grain bread with cheese.
    Slices of whole grain bread on a black plate.  One piece of bread is covered with cherry jam and a triangular slice of cheese.  Photo by author.


********* 

Interested in learning more about the Norwood CSA? Check out our Info Page: https://norwoodfoodcoop.blogspot.com/2021/10/how-to-join-norwood-csa.html

Buddha Bowls by Vaughan Myers-Jennings

Buddha Bowls 

by Vaughan Myers-Jennings

With all the various colors and flavors of veggies that we get in our CSA deliveries, it would be great if there were a dish to bring them all together, right? Well…rejoice! Buddha Bowls are the answer to your prayers.  Buddha Bowls (so named because they are “perfectly balanced” bowls) are build-your-own dishes that contain a grain, a vegetable, a fat, a protein, and a sauce. They’re the perfect dishes if you want to use a good portion of your CSA delivery in one shot. They’re also fun, because you can make them pretty regularly and decide which flavors work better together, there are no rules! Recently, my wife and I decided to give this a try after she had heard about it for some time. Our mix was rice, fava beans, tomatoes, beets, turnips, and cucumbers; it was both tasty and nutritious. 

Buddha bowl is cut up mixed vegetables. Photo by author.

Finally, and most importantly, to correctly bring all the flavors together, you MUST have the right sauce. Lemon tahini, carrot-ginger, whatever your heart desires. Experimentation is encouraged. For guidance/inspiration for your Buddha Bowls, visit https://tasty.co/article/lavanyanarayanan/buddha-bowl-recipes 

********* 

Interested in learning more about the Norwood CSA? Check out our Info Page: https://norwoodfoodcoop.blogspot.com/2021/10/how-to-join-norwood-csa.html

Monday, July 15, 2024

Easy Peach Cobbler by Patrice Hall


Easy Peach Cobbler

by Patrice Hall


A slice of peach cobbler on a pink plate with a fork and yellow napkin.  Image from SouthernLiving.com

One summer fruit we tend to receive lots of in our CSA shares is peaches, last year a few were wasted and the others I canned or used for jam.  I am planning to make more desserts from the fruit share and looking forward to doing some more fun things besides canning them.  My summer memories from childhood were watching my Grandma bake with the summer fruit. Cobblers were her specialty, the combination of moist pastry mixed with the sweetness of the peaches and the crunchiness of the sugar and crust filled me with joy.  It is one of my favorite peach dishes.  This recipe calls for only 6 ingredients (which is why it is called “easy”), nothing fancy, just items you already have in your pantry.  Another thing, you don’t have to peel them! I plan to make this more than once this summer, looking forward to the peaches this year!


Ingredients for Southern Living's Easy Peach Cobbler 

Fresh peaches: The fresh, fruity base of the cobbler. Choose ripe, juicy peaches for this recipe, although frozen, thawed peaches can also work in a pinch.

Salted butter: Melted to add richness to the cobbler.

Self-rising flour: Gives the cobbler its structure and lift.

Granulated sugar: Sweetens the cobbler. You can also use light brown sugar for extra depth.

Whole milk: Adds moisture to create the cake-like cobbler.

Vanilla extract: For depth of flavor.

Southern Living Easy Peach Cobbler ingredients


How To Make Easy Peach Cobbler

Step 1. Prepare cobbler: Gently rub the peaches under running water to remove fuzz, and slice. Place butter in an 11- x 7-inch baking dish; transfer to oven until melted. Stir together flour, sugar, milk, and vanilla in a bowl, and pour over melted butter. (Do not stir.) Top evenly with peaches.

Step 2. Bake: Bake until golden brown and bubbly.


View the full recipe at Southern Living for more tips and adaptations.

********* 

Interested in learning more about the Norwood CSA? Check out our Info Page: https://norwoodfoodcoop.blogspot.com/2021/10/how-to-join-norwood-csa.html