 |
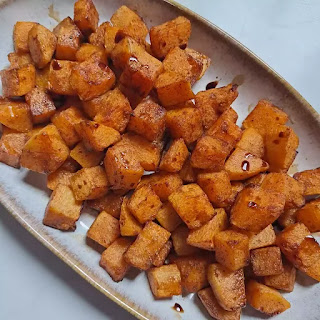
Golden chunks of seasoned air-fried butternut squash in an oval platter. Photo by author.
|
I love using an air fryer for times when I want to avoid using the oven. This recipe would take 45 minutes in the oven, but in the air fryer it takes 15 minutes!
You can find this recipe at The Spruce Eats website: https://www.thespruceeats.com/air-fryer-butternut-squash-recipe-5443004
Prep:15 mins
Cook:15 mins
Total:30 mins
Servings:4 servings
Yield:4 cups
Nutrition Facts (per serving)
351 Calories
7g Fat
68g Carbs
3g Protein
(Nutrition information is calculated using an ingredient database and should be considered an estimate.)
"This is a quick and delicious way to cook butternut squash. The cinnamon brings out the flavor of the squash and the balsamic glaze cuts through any extra sweetness. I had to fry my squash in two batches, so I kept the first batch warm in a very low oven while cooking the second."
—Julia Hartbeck
Ingredients
For the Squash
1 1/2 to 2 pounds butternut squash
1 teaspoon ground cinnamon
1/4 teaspoon fine salt, more to taste
1 dash freshly ground black pepper
1 to 2 tablespoons vegetable oil
For the Balsamic Glaze
2 cups balsamic vinegar
1/2 cup packed brown sugar
1 medium cinnamon stick, optional
Steps to Make It
Gather the ingredients.
Peel the squash. Scrape out and discard the seeds or roast them as you would pumpkin seeds.
Use a large, sharp chef's knife to cut the squash into 1-inch cubes
In a large bowl, toss the squash cubes with the cinnamon, salt, pepper, and oil.
If your air fryer manual recommends preheating, preheat it to 390 F. Brush the air fryer basket with some oil and add the squash. If you have more than 3 or 4 cups of cubes or your air fryer is small, you may need to cook the squash in 2 batches.
Cook the squash at 390 F for 15 to 20 minutes, stirring the squash or shaking the air fryer basket every 5 to 7 minutes.
Meanwhile, make the balsamic glaze.
Turn on an exhaust fan and open a window if you can. Combine the balsamic vinegar, brown sugar, and cinnamon stick, if using, in a medium saucepan and bring to a boil over medium heat.
Reduce the heat to a simmer and continue to cook until the mixture is reduced and coats the back of a spoon, about 10 minutes. You should have 2/3 to 3/4 cup of glaze.
Discard the cinnamon stick.
Transfer the hot butternut squash to a serving dish and drizzle with some of the balsamic glaze to taste.
Tips
A y-peeler makes peeling butternut squash fast and easy.
The squash doesn't have to be in a single layer, but avoid filling the air fryer basket more than one-third full, and be sure to toss it every 5 minutes to ensure it cooks and browns evenly.
For the vegetable oil, use one that can stand up to a high temperature, such as avocado oil, peanut oil, or grapeseed oil.
If your balsamic glaze is too thick, thin it with extra balsamic vinegar or water. Rewarm until it is liquid enough to drizzle.
Recipe Variations
For savory air fryer butternut squash, replace the cinnamon with 1 1/2 teaspoons of dried rubbed sage. Omit the balsamic glaze and serve the squash with brown butter or sage brown butter, or serve it with freshly grated Parmesan cheese. Adjust the seasonings as needed.
Replace the brown sugar in the glaze with an equal amount of maple syrup or honey.
How to Store Leftover Butternut Squash
Refrigerate leftover air fried butternut squash in an airtight container for up to 4 days.
Cooked cubed butternut squash may be frozen as well. Transfer the cooled squash cubes to a labeled zip-close freezer bag and freeze for up to 3 months. Defrost the squash in the refrigerator for a few hours or overnight.To reheat, transfer the leftover butternut squash to the
lightly oiled air fryer basket and cook at 390 F for 5 to 7 minutes, until hot all the way through.
Can you use cooking oil spray in an air fryer?
Some cooking oil sprays can cause the air fryer basket's nonstick finish to chip. Use a spray or mister with no propellants or use a pastry brush or paper towel to apply the oil.
*****
Interested in learning more about the Norwood CSA? Check out our Info Page: https://norwoodfoodcoop.blogspot.com/2021/10/how-to-join-norwood-csa.html


