Norwood CSA Food Co-op: July 2022

Thursday, July 21, 2022

Lettuce Talk about Greens by Jenny Pena

As the deliveries have started, I see an increase on one of my favorite vegetable….GREENS! I am sure we all have things we love about summer; as for me, I just love having lots of greens for lunch. They are in season and each day I can create a salad that doesn’t feel the same, plus, who wants to be cooking when the temperatures are high? I love to pair greens with seasonal fruit (those that have the fruit add-on can easily do that) and adding homemade dressing with olive oil, salt, lemon, mustard and honey (another item of choice to add on to your deliveries). While I sort of just eyeball the amounts when I make the dressing, I found a similar recipe online (see link here - https://jamjarkitchen.com/2022/04/20/honey-lemon-vinaigrette/#recipe )

Now comparison on 12 different greens is featured in an article from Business Insider (see article here - https://www.businessinsider.com/best-salad-greens-kale-spinach-lettuce-2017-6 ), ranking 12 common greens based on vitamins, protein and other nutrient content. I want to share how I use each of the greens featured and maybe add some personal tips on how I prepare them:

1.       Iceberg Lettuce – Did anyone say tacos? It may not be as high in terms of nutritional value but it feels fresh and has high water content which is great for the summer time.

2.       Arugula – Because of its peppery flavor I tend to mix it with other types of greens of milder taste but enjoy it best when served with grilled veggies like red peppers or corn.

3.       Radicchio – This one has lots of vitamin K. It has a bit of a bitter taste but I enjoy it grilled or sautéed with some oil and garlic. And if you want to eat it raw, cheese is your best friend.

4.       Watercress – One that is not as loved for its bitter taste, but great to lower risk of type 2 diabetes. I love to chop a lot of tomatoes and add the honey lemon dressing to it.

5.       Endives – Potassium, Fiber, Folate as well as the usual Vitamins A and K are in this vegetable. Another one that is great grilled or sautéed and if eaten raw, best to chop it thinly and add some grapes to the salad (thank me later).

6.       Leaf Lettuce/Butter Lettuce/Romaine – While different they all pack some Vitamin A, K, and Potassium. My trick to keep them fresh is to wash and dry then wrap some damp paper towels and in a Ziploc bag. However, I have to say the greens are so fresh from the farm I feel that they hold up well without much effort.

7.       Chard/Broccoli Leaves/Spinach/Kale – These are the highest in nutrients and surely my favorites. Chard – This one I would put in the Instant Pot to slow cook with some chicken stock, bones or bacon. Spinach – my favorite of all. I love it sautéed with eggs for breakfast, as a salad with pretty much anything for lunch and if I need a smoothie that’s the green of choice to add without affecting the flavor profile so much. Broccoli leaves and Kale – these I prefer cooked but if I want to make a salad I like to massage with my hands before mixing the rest of the vegetables.

Hopefully you try some tips to use your greens and learn to love and enjoy them as much as I have. Surely getting the deliveries through the CSA has been a great motivation to add more greens to my diet. 

*****

Interested in learning more about the Norwood CSA?  Check out our Info Page: https://norwoodfoodcoop.blogspot.com/2021/10/how-to-join-norwood-csa.html

Thursday, July 14, 2022

Vegetable Peel Chips by Patrice Hall

Veggie Peel Chips In a White Bowl

 
This is a great recipe for using up your scraps from cooking the CSA veggies, I never thought to do this until I read this article in The Spruce Eats at https://www.thespruceeats.com/vegetable-peel-chips-5179222.  Try this out and enjoy!
 

Prep:  10 mins
Cook:  20 mins
Drying:  10 mins
Total:  40 mins
Servings:  2 to 4
Yield:  3 cups
 

Nutrition Facts (per serving)
214 Calories
7g Fat
38g Carbs
4g Protein
(Nutrition information is calculated using an ingredient database and should be considered an estimate.)

When it comes time to roast, get creative with the seasonings. Transform your chips to a sweet or savory place depending on your snack mood. Enjoy them as a light afternoon snack or crumble them over a salad for a crunchy topper.

Ingredients
3 cups dried vegetable peels, and/or fruit peels (e.g., russets, sweet potato, carrot, apple, beet, etc.)
1 tablespoon vegetable oil, or canola oil
3/4 teaspoon salt, plus more for serving
1 tablespoon nutritional yeast, plus more for serving
 

Steps to Make It
Gather the ingredients.

Preheat the oven to 400 F. Lay the peels on 2 paper towel-lined rimmed baking sheets and pat dry. Let sit for 10 minutes to continue to air dry.

Place the peels in a large bowl, then add the oil, salt, and nutritional yeast. Toss to evenly coat.

Discard the paper towels from the rimmed baking sheets, evenly divide the peels between sheet and spread into single layers.

Bake for 20 minutes (checking at 15 minutes, as oven temperatures vary) or until the peels are golden brown and crispy, rotating the baking sheets halfway.

Taste the chips and adjust the seasoning with more salt and nutritional yeast, if desired. Enjoy on their own, with a side of hummus, or crumbled over a salad.

Recipe Tips
Make sure the peels are dry before coating with oil. Any water left behind will make the chips soggy.
 

Toss the dried peels in 1 tablespoon of cornstarch before baking for an extra crispy crunch.
 

Every veggie (or fruit) has its own starch and moisture content, so occasionally check the chips for doneness.
 

If you are baking different veggie varietals together, some may finish sooner than others—simply remove them from the baking sheet when ready and continue to bake the remaining peels.
 

The chips will keep in an airtight container for 5 days (if they last that long).
 

Spice it Up!
This is your snack party and you can flavor it however you like! Get creative and try a combo of any of the below ideas:

Ranch Powder
Italian Seasoning
Old Bay Seasoning
Taco Seasoning
Everything Bagel Seasoning
Salt and Vinegar (using apple cider vinegar powder)
Cinnamon sugar (use coconut oil for a pop of sweetness in place of the neutral oil)
Mediterranean: dried dill and lemon salt

Wednesday, July 6, 2022

Learning to Preserve our Shares by Patrice Hall

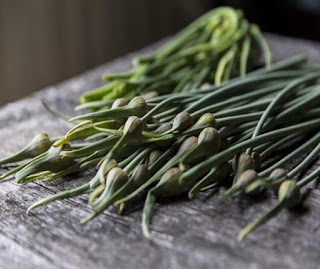
Over the 15 years I have been a member of this CSA I learned how to use and preserve the weekly share.  My favorite challenge is to use up everything and waste nothing (of course we always have composting 😊).  I am exploring fermenting and pickling veggies which never make it to our kitchen table.  Garlic scapes have always been a challenge and I still have some left over from previous weeks, so I am using this recipe to use the leftovers I have (just make sure to use the fresh ones)…

Garlic scapes on a table


Pickled Garlic Scapes By Molly Watson (on The Spruce Eats website: https://www.thespruceeats.com/pickled-garlic-scapes-2216022) 

Prep: 20 mins | Cook: 5 mins | Total: 25 mins | Servings: 8 servings | Yield: 1 pint 

Garlic scapes are the curled flower stalks of hard-necked garlic, which is a family of garlic varieties that are grown in colder climates. These stalks are cut off by farmers to encourage better bulb growth. Pickled garlic scapes are an easy way to keep the lightly garlicky flavor of these garlic scapes around a little longer. These are easy "refrigerator pickles," which means they require no heat processing, but they must be kept in the fridge. 

Ingredients:

  • 15 garlic scapes
  • 1 dried chile, optional
  • 1 cup cider vinegar
  • 4 teaspoons fine sea salt
  • 4 teaspoons sugar
 

Steps to Make It: Gather the ingredients. Trim the garlic scapes, curl them up, and place them in a pint jar with a tight-fitting lid. We like to truly stack them on top of one another to make them pretty, and then fill in the center space with more tightly curled scapes, but you can also cut the scapes into bite-sized pieces and then just pile them in. 

Work the chile, if you're using it, into the jar with the garlic scapes. Tuck it in the center, or work it in along the side of the jar so you can see it. (This is especially useful if you're making more than 1 pint and some have chile and some don't.) 

In a small saucepan over medium heat, bring the vinegar, salt, and sugar with 1 cup of water to a simmer. Cook, swirling the pan if necessary until the salt and sugar are fully dissolved. 

Pour the warm vinegar mixture over the garlic scapes in the jars to cover them (you may not use all of the vinegar mixture), but leaving about 1/2 inch of headspace at the top (between the top of the liquid and where the lid will be). Screw the lid on the jar. Let it sit until cool, then store it in the refrigerator for at least four weeks and up to six months to let the flavors blend and the garlic scapes to "pickle." The pickles will get more tender over time, but their flavor will stay garlicky strong.